How to install a basement sump pump

April 28, 2017

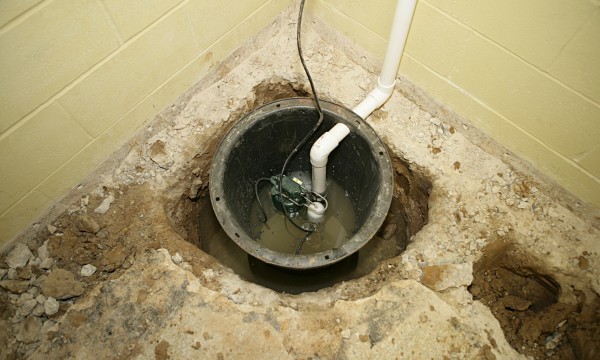
It’s no fun finding water, especially a lot of water, in your basement. Flooding in the basement can be due to a number of issues and it's important to remember that a sump pump doesn’t solve the problem. A pump simply takes the water and puts it somewhere else.

However, if you've checked all the likely causes of why there is water in your basement or if your property is on a high water table and subject to flooding, the installation of a sump pump can certainly make life more pleasant. Follow these step-by-step instructions for choosing and installing a sump pump. [Photo Credit: istock.com/ftwitty]

How to install a basement sump pump

Time: 30 minutes (excluding time to dig a sump pump pit)
Frequency: N/A
Difficulty: Easy
Tools: Electric drill and bits, hammer, pipe cutter, jackhammer (if there's concrete)
Materials: Pressurized fittings, wire ties, gravel, PVC pipe, corrugated pipe, cement, check valve, silicone sealer.

Step 1: Types of sump pumps

  •      There are two basic types of sump pumps: a pedestal pump and a submersible pump. The pedestal pump sits above ground and the submersible sump pump sits in a pit under your house.
  •      While a pedestal pump is easier and less expensive to install and maintain, it tends to be noisier and is visually unappealing. It could be a suitable choice for an unfinished basement.
  •      The submersible sump pump has an airtight lid to keep out debris and stop moist air from entering your home. Because it's underneath your house, and usually underneath water, there's less noise and it's virtually invisible.
  •     A back-up sump pump is also a good idea in the event the primary pump fails, particularly if the basement is a living space or used for storage. Battery-operated back-up sump pumps are available for areas subject to frequent power outages.

Step 2: Locating the sump pump pit

The first step is deciding where the sump pump is to be located.

  •      It should preferably be installed at the lowest point of your basement. Placing a sump pump at the lowest point means that if a flood occurs, the system can help drain the basement without water pooling elsewhere.
  •      The pump should be positioned close to a GFCI (Ground Fault Circuit Interrupter) to plug in. If there isn't a convenient GFCI close by, contact an electrician and have one installed.
  •      If you have a finished basement, placing the pump may be a little more complicated, as the best place for the pump might not fit into how you've finished your basement. You may want to talk to a plumber to determine alternate locations.

Watch out!

Before you begin to dig the sump pit, check the local building codes to make sure you don't need a permit and to see if there are regulations for placement and drainage.

Step 3: Preparing the sump pit

  •     If your basement floor is concrete, you'll need a jackhammer to break it up and dig the sump pit. Electric jackhammers can usually be rented from a hardware store and can be easily plugged into a regular household outlet.
  •      Place the sump basin upside down on the floor and draw a circle approximately 10 – 15 cms (4 – 6 ins) wider than the basin.
  •      Dig a hole the width of the circle and deep enough so that the top of the basin is flush with the basement floor.
  •      Place about 8 cms (3 ins) of gravel at the bottom of the hole and set the basin in the hole.
  •      Fill the gaps around the basin with gravel, leaving 3 – 5 cms (1 – 2 ins) exposed at the top.

Good to know!

Install the sump pit at least 3 metres (10 feet) away from the wall to avoid hitting the footing of your home’s foundation. Before you dig the pit, make sure you know where your water and sewage pipes are located.

Step 4: Installing the sump pump

  •     Glue the male adapter to the PVC discharge pipe and place the female adapter on the pump.
  •     Use a drill to make a hole into the discharge pipe about 15 cms (6 ins) above the pump. This is the weep hole that allows water to flow back into the sump pump and keep it primed when it's turned off.
  •     Attach the sump pump's electrical cord to the discharge pipe using wire ties.
  •     Install a check valve on the open end of the discharge pipe.
  •     Place the sump pump into the sump basin, plug it in and test it by filling the basin with water before going further.

Good to know!

Make sure your check valve is designed for vertical a operation.

Step 5: Completing the drainage

  •    Connect pressurized fittings and PVC drainage piping to carry the water out of the house.
  •     Make a hole through the outside wall and run the PVC pipe out.
  •     Apply silicone sealant around the hole where the pipe leaves the house.
  •     Run the drainage pipe at least 1.2 metres (4 feet) away from the house.

With your new sump pump installed, you can now plug it in, place the cover over the top, and stand back to admire your work. The next time your basement floods, your sump pump should switch on automatically and drain the water out of your home, keeping you and your family safe and dry.

The material on this website is provided for entertainment, informational and educational purposes only and should never act as a substitute to the advice of an applicable professional. Use of this website is subject to our terms of use and privacy policy.
Close menu